Tutorials • DNS
Editing an MX DNS record zone using WHM
Learn how to edit MX type DNS records using WHM. Follow the simple steps to efficiently configure email routing.
Views 929Updated 2 aniPublished on 25/09/2018by Sebastian S.
Introduction
- The DNS (Domain Name Service) converts human-readable domain names (e.g.: example.com) into computer-readable IP addresses (e.g.: 192.0.32.10). DNS relies on "DNS zones" that exist on the server to convert domain names to IP addresses.
- WHM provides the ability to modify an MX type DNS record. This functionality is offered by DNS Functions, specifically MX Entry Editor.
Requirements
- WHM login details. These can be found in the email with the management details of the reseller account or the VPS with cPanel/WHM.
Steps
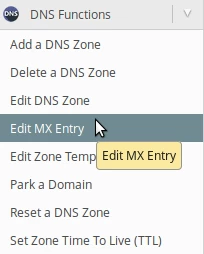
- After logging into the WHM panel on the left side of the page, we will go to the DNS Functions section and click on MX Entry Editor. Alternatively, we can search for this menu using the search field at the top left.
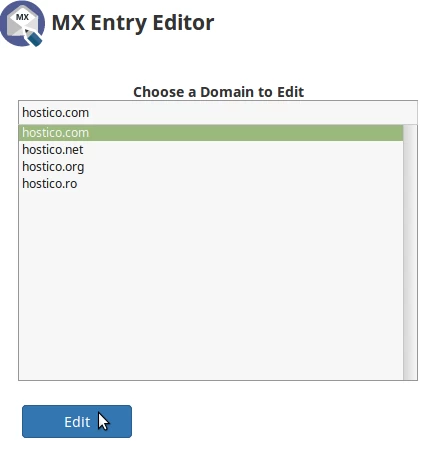
- On the next page, we will choose the domain for which we want to make changes.
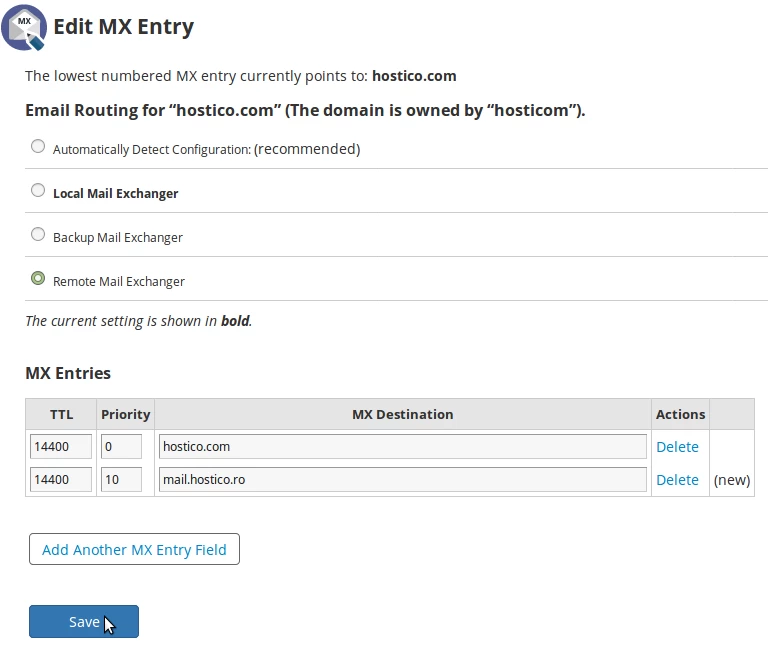
- On the next page at the top, we will be able to choose where we want to route the emails:
Local Mail Exchanger (the email server used is local) - the email server used will be the local one.
- the email server used will be the external one, but in case the external server is unavailable, the local one will be used.
- the email server used will be an external one, according to the MX records. - At the bottom of the page in the MX Entries section, we will be able to add new MX records and modify or delete existing ones. If we want to direct emails to another mail server, we will add the corresponding MX records. The table with existing MX records will contain the following columns:
TTL - time to live
Priority - the priority of the mail server
MX Destination - the email server address. - To add a new record, we will click on Add Another MX Entry Field. In the row that will appear, we will be able to add the mail server information.
- Once the routing and MX records have been set, we will click on the Save button at the bottom of the page to confirm the settings.
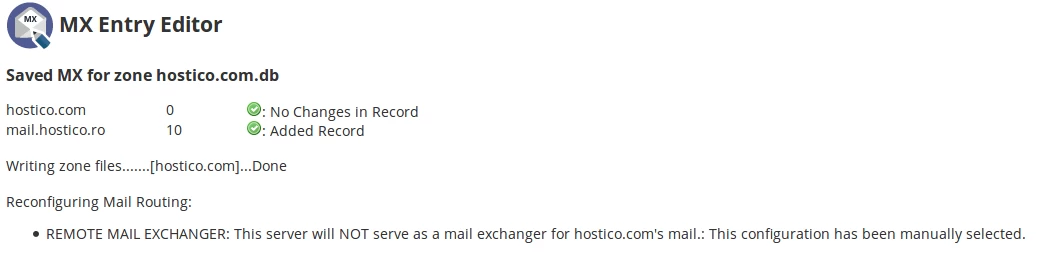
- If everything went smoothly, we will be greeted by a success message, as shown in the image below.